My Project Charter template is the tool I use to align client expectations and build trust from day one. It takes 15 minutes to fill out and stops the phrase “but I thought this was included” in its tracks.

Ravenor's Design Academy | Rendering an Exterior without rendering!

Hey designers!

For sure if you’ve come to this post then its either,

  • Your inner artist just isn’t willing to let you give up on the whole process of rendering an exterior scene and the hassle of getting everything to look just right
  • You don’t have a render engine
  • You have a deadline coming up and can’t afford to have your machine crippled..

Something along those lines, right?

Drum rolls please… You’ve come to the right place!

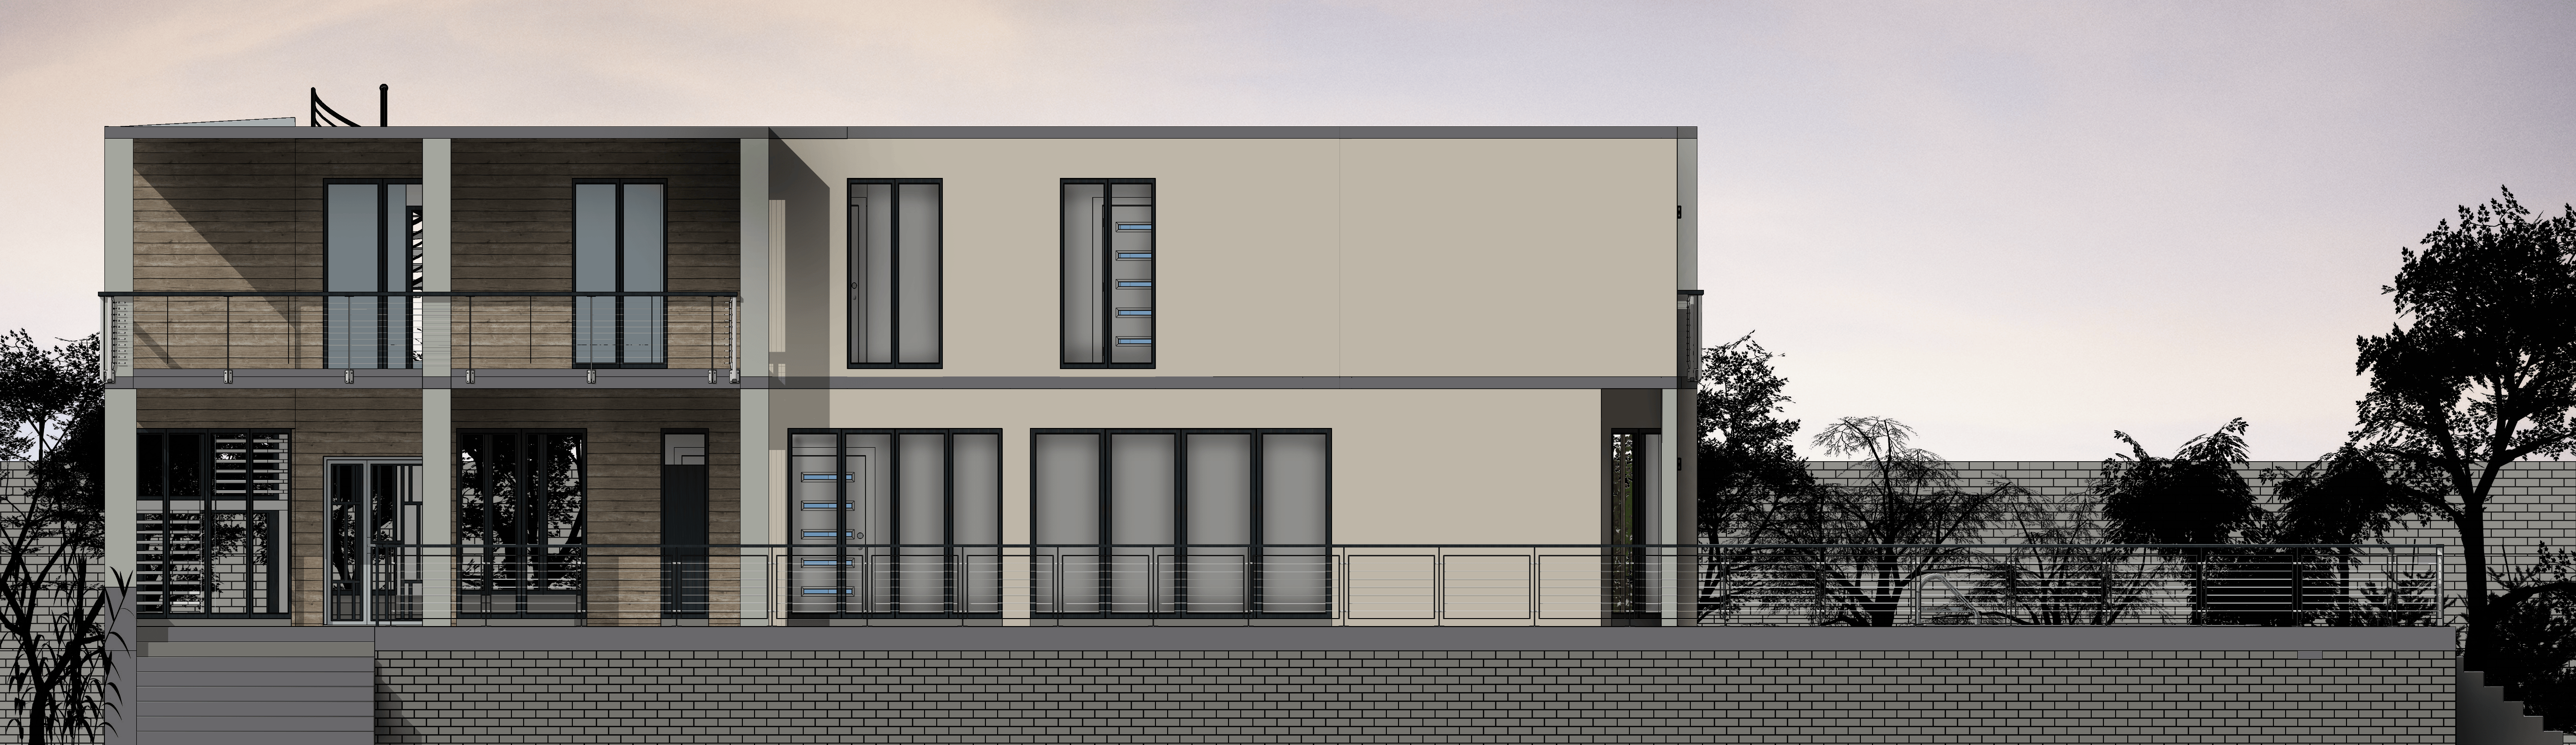
In my search for diverse presentation styles that take less of my time yet have the effect I want, I came across a few pretty cool techniques that have all I was looking for and then some. This post was inspired by one of my favorites.

In this tutorial, I’m going to show you how I managed to get the result shown in the image above in a few easy steps.

I also have a little treat waiting for you at the end of this post.

All you’ll need is a textured model, Photoshop, and a few minutes of your time.

Step 1

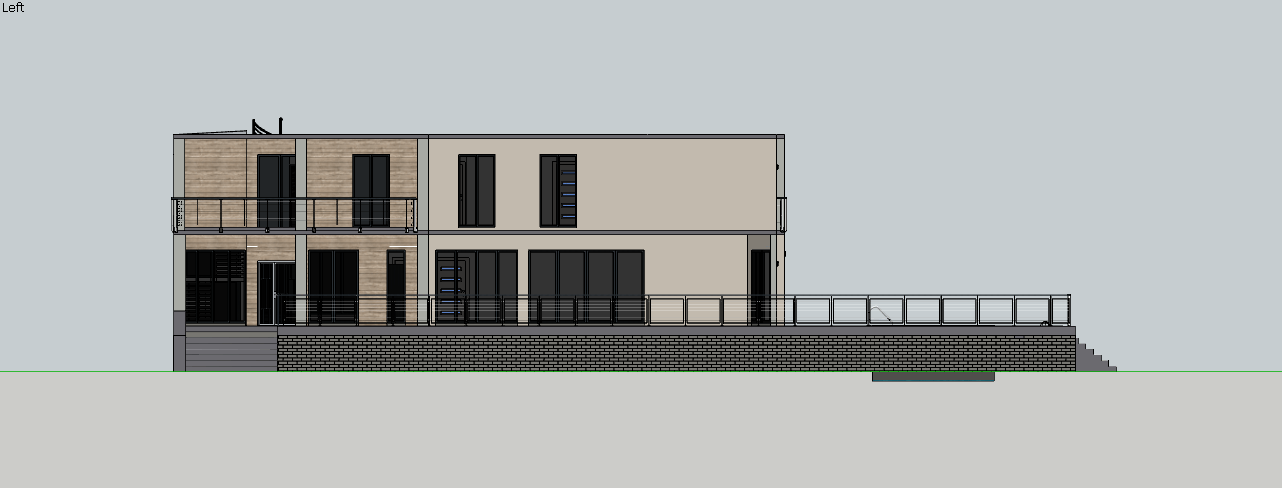
First we start by getting the view we want. To do so choose a view from the ‘Views’ toolbar and then head over to Camera>Parallel Projection.

**Make sure you don’t move your model around so the images line up easily later on.
Ravenor's Design Academy | Rendering an Exterior without rendering!
I Chose the left side of my model without any other flourishes.

Make sure you delete any unnecessary lines from your model (Use your Eraser tool + Shift on your keyboard to hide them without compromising your surfaces), also you need to go to View>Edge Style and make sure that only ‘Edges’ is enabled.

**What I mean by unnecessary lines is those lines that do not signify a wall break or an extrusion; if a surface is flat and continuous with lines on it, they are unnecessary.

Next thing you need to do is export three different images (File>Export>2D Graphic).

Ravenor's Design Academy | Rendering an Exterior without rendering!
5500×2096 is the perfect size in my opinion for a good quality image
  1. Make sure that you choose a PNG file type.
  2. Click on ‘Options’.
  3. Choose a high resolution for your image, and make sure ‘Transparent Background’ is checked.
  4. Export your images to the same folder for easy access.
  5. You only need to do this once, your preferences are saved for future use.

Now, the images we want to export are as follows:

Image 01: Hidden Line

Basically what you do is go to View>Face Style>Hidden Line.

**

Image 02: Textures

View>Face Style>Shaded with Textures.

**

Image 03: Shadows

For this you need to disable your lines (View>Edge Style and uncheck ‘Edges’) and you need to go back to ‘Hidden Line’ face style.

**

Afterwards you need to turn on your shadows by either using the ‘Shadows’ window (Window>Default Tray>Shadows for 2017 and 2016 or Window>Shadows for older versions).

Ravenor's Design Academy | Rendering an Exterior without rendering!
These are the values of choice, and I recommend them if you don’t feel like experimenting

I like using these settings for my shadows, but you can play around a bit and see what you prefer or what suits your model.


Step 2

Open your Photoshop and add all 3 exported images.

Layer your images on top of each other (if they are open in multiple tabs, drag them into a single tab).

Name your layers (double click the layer labels in the Layers tab) so you can easily know what’s what and put them in the order shown below (drag and drop).

Ravenor's Design Academy | Rendering an Exterior without rendering!
Always rename your layers to find them easily.

Step 3

Using the ‘Magic Eraser’ tool (right click the Eraser) and delete any background colors that may have been exported (do so on all 3 layers). On the Hidden Line image, remove the color of the model and keep the lines only.

**To make that task easier, uncheck ‘Contiguous’ so it removes all the colors of the same hue that you don’t need in one click.

**Use the ‘eye’ icon next to each layer to hide what you’re not working on so you don’t get confused, this will also help you keep track of which layer you’re on so you can avoid making mistakes.

Ravenor's Design Academy | Rendering an Exterior without rendering!
Before and After for each layer.

After that, set the ‘Hidden Line’ and the ‘Shadows’ layers to ‘Multiply’.

Ravenor's Design Academy | Rendering an Exterior without rendering!
Using ‘Multiply’ blends all the color properties together.

Step 4

Using the ‘Magic Wand’ tool, and on the Lines layer, select the areas with shadows in them.

Ravenor's Design Academy | Rendering an Exterior without rendering!
For multiple selections, hold ‘Shift’ on your keyboard while you click

Select the ‘Burn’ tool (Right Click Dodge Tool>Burn Tool):

  1. Open the brush palette.
  2. Choose one of the very soft brushes (depending on the size of the area selected).
  3. make sure ‘Hardness’ is 0%.
  4. Make sure ‘Range’ is ‘Midtones’.
Ravenor's Design Academy | Rendering an Exterior without rendering!
Choose your brush size carefully, and keep in mind that you can always undo.

Select the ‘Shadows’ layer and, using very soft strokes, darken the areas of shadows that are closer to the object casting those shadows as well as any corners, and as you move further away from the object the shadows should remain lighter.

Ravenor's Design Academy | Rendering an Exterior without rendering!
Use fluid short strokes (you need a mouse or a graphic pad for that, don’t use your touch pad).

Repeat the selection on the ‘Lines’ layer, and the burn tool on the ‘Shadows’ layer until you’ve covered all the shadows.

Your results should be similar to this.

Ravenor's Design Academy | Rendering an Exterior without rendering!
How dark or light the burns are depend on how you want your own taste

Since this post turned out to be a bit lengthy, I’ll be posting another part of this tutorial to show you how I added the background, as well as the decorative elements that complete it.

I also haven’t figured out what to do with the windows, so as soon as I get that figured out I’ll post something on that too.


As for the treat I promised: for practice purposes, I’ve uploaded some images from the model I used to make this tutorial so you can hone your technique! They’re from another side of the house just to add a little challenge to the practice 🙂

You can download them HERE.


If you have any questions or suggestions, leave a comment and I’ll reply as soon as I get the notification.

Signature

Make sure you sign up to get all the latest updates right to your inbox.

← Back

Thank you for your response. ✨


Leave a Reply

We use cookies to personalise content and ads, to provide social media features and to analyse our traffic. We also share information about your use of our site with our social media, advertising and analytics partners. View more
Cookies settings
Accept
Privacy & Cookie policy
Privacy & Cookies policy
Cookie name Active

Privacy & Cookies Policy for Ravenor’s Design Academy

Last updated: April 20, 2025 Ravenor’s Design Academy ("we", "us", "our") is committed to protecting your privacy and providing transparency about how we collect, use, and share your data. This combined Privacy & Cookies Policy explains our practices when you visit https://www.ravenorsdesign.com, subscribe to our newsletter, or otherwise interact with our services.

1. Information We Collect

a. Personal Information You Provide

  • Contact Details: Name and email address when you sign up for our newsletter or contact us.
  • User Submissions: Comments, feedback, or messages you send via forms or email.

b. Automatically Collected Information

  • Log Data: IP address, browser type/version, operating system, pages viewed, referral URLs, and timestamps.
  • Usage Data: Session duration, click paths, and interactions on the site.

c. Third‑Party Data

  • Social Media: If you link or share via social platforms (LinkedIn, Facebook, X, Instagram), we may receive basic profile information as permitted by your privacy settings and the platform’s API.

2. Cookies & Tracking Technologies

a. What Are Cookies?

Cookies are small text files placed on your device to store preferences, track site usage, and enable certain features. We use cookies, web beacons, and similar technologies ("tracking technologies") to enhance your experience.

b. Types of Cookies We Use

  1. Essential Cookies: Required for basic site functionality (e.g., form submissions, sign‑in). These cannot be disabled.
  2. Performance & Analytics Cookies: Collect anonymous data on site usage and performance to help us optimize content and design.
  3. Functional Cookies: Remember your preferences (e.g., language, form entries) for a personalized experience.
  4. Advertising & Targeting Cookies: Third‑party cookies that deliver relevant ads based on your browsing history (if applicable).

c. Third‑Party Cookies

We partner with trusted analytics and marketing providers (e.g., Google Analytics, Mailchimp) who may set cookies via our site to help us analyze traffic, measure campaign effectiveness, and improve our services.

d. Managing Cookies

You can manage or delete cookies through your browser settings at any time:
  • Chrome: Settings > Privacy and security > Cookies and other site data
  • Firefox: Options > Privacy & Security > Cookies and Site Data
  • Safari: Preferences > Privacy > Manage Website Data
Note: Disabling cookies may affect site functionality and your ability to access certain features.

3. How We Use Your Information

  • Service Delivery: Send newsletter content, downloadable resources, and updates based on your preferences.
  • Communication: Respond to inquiries, provide support, and inform you of policy changes.
  • Analytics & Improvement: Analyze usage patterns, A/B test content, and optimize user experience.
  • Marketing: With your consent, deliver promotional content about new posts, resources, or events. Unsubscribe options are provided in every email.

4. Sharing & Disclosure

  • Service Providers: We share data with vendors (hosting, email, analytics) under confidentiality agreements.
  • Legal Requirements: We may disclose data to comply with legal obligations or protect rights.
  • No Sale of Data: We do not sell, trade, or rent your personal information to third parties.

5. Data Security & Retention

  • We employ SSL encryption, firewalls, and access controls to safeguard your data.
  • Data is retained only as long as necessary for the purposes described or as required by law.

6. Your Rights

Depending on your jurisdiction, you may have rights to:
  • Access, correct, or delete your personal data.
  • Restrict or object to processing.
  • Withdraw consent for marketing communications.
  • Lodge a complaint with a supervisory authority.
To exercise these rights, contact us at hello@ravenorsdesign.com.

7. Children’s Privacy

Our services are not intended for individuals under 16. We do not knowingly collect data from minors. If you believe we have, please contact us for deletion.

8. International Data Transfers

Your data may be processed and stored outside your country. We implement safeguards, such as Standard Contractual Clauses, to protect your data when transferred internationally.

9. Changes to This Policy

We may update this policy periodically. The "Last updated" date at the top reflects the most recent revision. We will notify subscribers of material changes via email or site notice.

10. Contact Us

If you have questions or concerns about this Privacy & Cookies Policy, please reach out:

← Back

Thank you for your response. ✨

Ravenor's Design Academy | Rendering an Exterior without rendering! Ravenor's Design Academy | Rendering an Exterior without rendering!

document.getElementById( "ak_js_3" ).setAttribute( "value", ( new Date() ).getTime() );

Thank you for trusting Ravenor’s Design Academy with your information.

End of Privacy & Cookies Policy  
Save settings
Cookies settings