Tutorial for VRay 3.4 is through here!

If you’re tired of altering those ready made materials to suit what you have in mind, this is the post for you!
It’s a pretty simple procedure that requires intermediate skills in image editing, SketchUp, and Vray.
For starters, you can use the images I used in this tutorial to practice as we go through this step by step. Just right click and save them.

 You will need

– Tile-able or Seamless texture images of your required material (You can either search them on Google Images or Devian Art).
– Photoshop or any other image editing program (Nothing Complicated).

 In this tutorial I’m using

Sketchup 2014
Vray 2.4
ACDSee Pro 7.0

 Here is what you have to do

  • Make a folder where you can save all your “home-made” textures in and make sure it’s organized for easier future access.
*For example: I created a ‘Textures’ folder with a ‘Stone’ sub-folder and sub-folders each containing a different kind of stone like ‘Brick’, ‘Brown Tiles’, ‘White Wall’, etc..
*This doesn’t apply to transparent textures tho, I’ll make a tutorial for those later on.
 
  • Save your texture images in their folders (preferably high quality clear pictures for better results).
 
07-4172
Original Material Image
  • Open your texture image in an editing program, turn it greyscale either by converting it to ‘Black and White’ or adjusting the ‘Saturation’ (you may need to adjust the Brightness/Contrast), then ‘Save As’ and give it a new name in the same folder as the original image.
 

07-4172-bump

  • Using the Bump Image, adjust the Brightness/Contrast, and then save it in the same folder but with a different name (so now you’ll have three different images of the same material).
*Do this step only if you have a texture that has detail you need to pop in 3D in the final render like: carpet, brick, stone, grass, tiles, engraved or embossed surfaces.. etc. or you will end up with a really grainy couch or grooved Laminate Surfaces.
 

07-4172-disp

  • For Bump & Displacement Maps, you need to keep in mind that Darker areas are Receeded and Lighter areas are Protruding.
  • Repeat the process for all the required materials.

 
  • In SketchUp, use random colors or materials and apply them to places you want to add those textures to, then rename each in the Material window to recognize them.
*You can open the material window by going to Window tab>Materials.
 
Create Your Own VRay Material
A Random Stone Material

  • In The Material Window click the ‘Create New Material’ button.
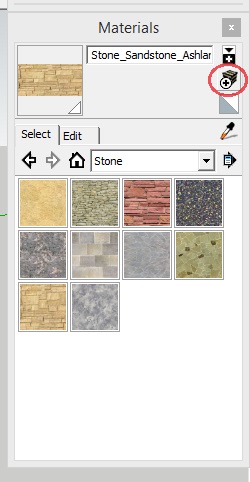
 
Create Your Own VRay Material
Material Window
  • A window will open. Click the ‘Browse’ icon, navigate to your material and choose the original texture image, then rename it for easier access later.
 
Create Your Own VRay Material
Create The Material
Create Your Own VRay Material
Choose your material image
  • You will find that the chosen material has replaced the original one.
*If that doesn’t happen, you navigate to ‘In Model’ materials, delete the old material and the new one will appear. 
 
Create Your Own VRay Material
Preview of applied material

  • Sometimes there are extra materials in your model that come from importing Components or simply a leftover from the 2D human figure that appears when you start Sketchup.
  • To Clear them out go to ‘Window’ menu and select ‘Model Info’.
 
Create Your Own VRay Material
Window>Model Info
  • Find ‘Statistics’ and then click ‘Purge Unused’, wait till it’s done then close the window.
*This also helps when your model gets too heavy or the file gets too large. It simply gets rid of all unused hidden elements that stay in your model even after you delete them.
 
Create Your Own VRay Material
Clean your model regularly this way
  • If you have the ‘In Model’ materials shown, you will see that only the materials actually used in your model are there and nothing else.
 
Create Your Own VRay Material
Check your ‘In Model’ materials

  • In the Vray toolbar click ‘M’ to open the material editor.
Create Your Own VRay Material
VRay Material Editor button
  • Find the first material you want to replace in the materials list and click it once (Select/Highlight it). You will see multiple tabs, and no preview available or a distorted material image. We need the ‘Maps’ tab for now. Check the ‘Bump’ box (the ‘Displacement‘ box should be checked only if you made that Negative texture).
 
Create Your Own VRay Material
Enable ‘Bump’ and/or ‘Displacement’
Create Your Own VRay Material
Edit ‘Bump’ and/or ‘Displacement’ maps
  • Click on ‘M’ beside the check box to open the window and choose your bump texture.
    • When you click it, a window will appear with a Drop Down menu under the Preview.
    • Choose ‘TextBitmap’ from the browse button ‘…’ next to ‘File’.
    • Pick the black and white image.
*Repeat these steps once again for Displacement, but pick the negative image instead. The preview image might come out distorted after you do that so just uncheck ‘Live Update’ and click ‘Preview’.
 
Create your own VRay Materials
Choosing the Bump map

  • After you’re done you will see that your material changes shape and took on a realistic look in the Preview.
 
Create your own VRay Materials
After following the previous steps, this is what you should end up with!
  • Repeat the last few steps to all your materials. It’s a long process, I know, but it’s worth it since you get to save that material and use it later!

Here’s how:

  1. Right click your material in the ‘Material List’.
  2. Select ‘Save Material’.
  3. Navigate to your textures folders.
  4. Save it next to its sister texture images.
And Voila! you have your own Material Library!!

  • After you are done, render your image and see the epic result; you will notice in the render below that the stones look more realistic in comparison to the grass and the cement top & base.
 
Create your own VRay Materials
Final Result
If at any point, you face confusion or frustration, worry not! It wasn’t easy for me the first time either. Just come back to this post, take a deep breath and revise the steps. If you set your mind to it, nothing can stand in your way!

Keep in mind that you can comment below with any questions and I’ll get back to you ASAP.
 

Hey, don’t forget to Subscribe before you leave!

You’ll get weekly doses of inspiration, access to our subscriber’s library full of  free helpful eBooks and modeling resources + you can be a member of our little Tribe Community on Facebook; full of awesome designers just like you.

 Join the Tribe

 
Signature

Related reading


Angie Soliman Avatar

Written by

More about me


19 responses to “How to Create Your Own Materials For VRay 2.0+”

  1. […] texture images is not going to cut it. You either need to create your own materials (tutorials for VRay 2.4 + VRay 3.6) or find high quality ready packed materials (I got mine for FREE from here & […]

  2. […] tutorial is linking the gap between our very first Material Tutorial for VRay 2.4 and our most recent one for VRay […]

  3. Download Lucky Patcher No root Avatar
    Download Lucky Patcher No root

    Thank you a bunch for sharing this with all people you actually recognise what you’re talking approximately!
    Bookmarked. Kindly additionally consult with my website =).
    We can have a hyperlink change contract between us

    1. You’re welcome 🙂 Your website is about android? Unfortunately it’s not related to the content I provide here. Unless you have something that can benefit my readers that I have overlooked?

  4. best dehumidifiers for basements Avatar
    best dehumidifiers for basements

    I do consider all the concepts you have presented to your post.
    They are very convincing and can certainly work.

    Nonetheless, the posts are too brief for starters. May just you
    please extend them a bit from subsequent time? Thanks for
    the post.

    1. This was an overview of the process, I have posted something more specific for transparent materials, you can find it HERE.

  5. I all the time used to read piece of writing in news papers but now as I am a user of net thus from
    now I am using net for content, thanks to web.

  6. […] I create a material from scratch, I usually just pick any random color from the Sketchup ‘Material’ window, rename it, […]

  7. This is a great tip particularly to those new to the blogosphere.
    Short but very accurate info… Thanks for sharing this one.
    A must read article!

    1. Thank you 🙂

  8. Hello it’s me, I am also visiting this web site daily, this website is genuinely fastidious
    and the people are truly sharing good thoughts.

  9. ds android emulator Avatar
    ds android emulator

    An impressive share! I have just forwarded this onto a coworker who had been doing a
    little homework on this. And he in fact ordered
    me lunch due to the fact that I found it for
    him… lol. So let me reword this…. Thank YOU for the
    meal!! But yeah, thanks for spending the time to discuss this
    topic here on your web site.

    1. Hope you enjoyed that meal! And you’re welcome 🙂 glad to help!

  10. […] can also avoid importing textures all together and create your own; that way you can keep track of them as you […]

  11. […] type of result you will get when using these options. To Create Your Own Material you can try THIS. In this picture I used these materials, to show the render at its […]

  12. […] Reference Article : How to create your own material on Vray/SketchUp […]

  13. Thanks For your sharing.

    1. You’re welcome 🙂 Just trying to help 🙂

Leave a Reply

We use cookies to personalise content and ads, to provide social media features and to analyse our traffic. We also share information about your use of our site with our social media, advertising and analytics partners. View more
Cookies settings
Accept
Privacy & Cookie policy
Privacy & Cookies policy
Cookie name Active

Privacy & Cookies Policy for Ravenor’s Design Academy

Last updated: April 20, 2025 Ravenor’s Design Academy ("we", "us", "our") is committed to protecting your privacy and providing transparency about how we collect, use, and share your data. This combined Privacy & Cookies Policy explains our practices when you visit https://www.ravenorsdesign.com, subscribe to our newsletter, or otherwise interact with our services.

1. Information We Collect

a. Personal Information You Provide

  • Contact Details: Name and email address when you sign up for our newsletter or contact us.
  • User Submissions: Comments, feedback, or messages you send via forms or email.

b. Automatically Collected Information

  • Log Data: IP address, browser type/version, operating system, pages viewed, referral URLs, and timestamps.
  • Usage Data: Session duration, click paths, and interactions on the site.

c. Third‑Party Data

  • Social Media: If you link or share via social platforms (LinkedIn, Facebook, X, Instagram), we may receive basic profile information as permitted by your privacy settings and the platform’s API.

2. Cookies & Tracking Technologies

a. What Are Cookies?

Cookies are small text files placed on your device to store preferences, track site usage, and enable certain features. We use cookies, web beacons, and similar technologies ("tracking technologies") to enhance your experience.

b. Types of Cookies We Use

  1. Essential Cookies: Required for basic site functionality (e.g., form submissions, sign‑in). These cannot be disabled.
  2. Performance & Analytics Cookies: Collect anonymous data on site usage and performance to help us optimize content and design.
  3. Functional Cookies: Remember your preferences (e.g., language, form entries) for a personalized experience.
  4. Advertising & Targeting Cookies: Third‑party cookies that deliver relevant ads based on your browsing history (if applicable).

c. Third‑Party Cookies

We partner with trusted analytics and marketing providers (e.g., Google Analytics, Mailchimp) who may set cookies via our site to help us analyze traffic, measure campaign effectiveness, and improve our services.

d. Managing Cookies

You can manage or delete cookies through your browser settings at any time:
  • Chrome: Settings > Privacy and security > Cookies and other site data
  • Firefox: Options > Privacy & Security > Cookies and Site Data
  • Safari: Preferences > Privacy > Manage Website Data
Note: Disabling cookies may affect site functionality and your ability to access certain features.

3. How We Use Your Information

  • Service Delivery: Send newsletter content, downloadable resources, and updates based on your preferences.
  • Communication: Respond to inquiries, provide support, and inform you of policy changes.
  • Analytics & Improvement: Analyze usage patterns, A/B test content, and optimize user experience.
  • Marketing: With your consent, deliver promotional content about new posts, resources, or events. Unsubscribe options are provided in every email.

4. Sharing & Disclosure

  • Service Providers: We share data with vendors (hosting, email, analytics) under confidentiality agreements.
  • Legal Requirements: We may disclose data to comply with legal obligations or protect rights.
  • No Sale of Data: We do not sell, trade, or rent your personal information to third parties.

5. Data Security & Retention

  • We employ SSL encryption, firewalls, and access controls to safeguard your data.
  • Data is retained only as long as necessary for the purposes described or as required by law.

6. Your Rights

Depending on your jurisdiction, you may have rights to:
  • Access, correct, or delete your personal data.
  • Restrict or object to processing.
  • Withdraw consent for marketing communications.
  • Lodge a complaint with a supervisory authority.
To exercise these rights, contact us at hello@ravenorsdesign.com.

7. Children’s Privacy

Our services are not intended for individuals under 16. We do not knowingly collect data from minors. If you believe we have, please contact us for deletion.

8. International Data Transfers

Your data may be processed and stored outside your country. We implement safeguards, such as Standard Contractual Clauses, to protect your data when transferred internationally.

9. Changes to This Policy

We may update this policy periodically. The "Last updated" date at the top reflects the most recent revision. We will notify subscribers of material changes via email or site notice.

10. Contact Us

If you have questions or concerns about this Privacy & Cookies Policy, please reach out:

← Back

Thank you for your response. ✨

Ravenor's Design Academy | How to Create Your Own Materials For VRay 2.0+ Ravenor's Design Academy | How to Create Your Own Materials For VRay 2.0+

document.getElementById( "ak_js_2" ).setAttribute( "value", ( new Date() ).getTime() );

Thank you for trusting Ravenor’s Design Academy with your information.

End of Privacy & Cookies Policy  
Save settings
Cookies settings